Table of Contents
This article will offer you a comprehensive guide for the lab fume hood. It is a required knowledge for lab new staff.
What Is A Lab Fume Hood?
Many people who is new for lab furniture and fume hood always have questions on what the lab fume hood is used for. A fume hood also calls lab hood or lab ventilation hood. It is used to exhaust the dust, toxic air, harmful substances when having an experiment in laboratory, so it can protect the lab staff from the exposure of the hazardous.
The Function Of A Fume Hood
The main function of a fume hood is using a negative air pressure to move the hazardous substance outside the laboratory.
Ventilation: When the laboratory staff having an experiment, the chemical reaction may create some substance that will harm the user, such as the flammable, acid liquid, toxic vapor etc.
Containment: The fume hood has an isolation space with a chemical resistant bench top, by using a fume hood will confine the harmful substance to a limited space.
Protection: A fume hood has a glass sash to shield the splash liquid, flammable air, volatile, so it can protect the laboratory operator while having a chemical experiment.
Filtration: Some Chemical reaction will release the toxic dust or hazardous air, the fume hood equipped with a filter will control the discharge meet the environmental requirements.
The Structure Of A Fume Hood
A fume hood is included the following 10 key components.
Worktop: Where the experiment will be conducted in the fume hood? Yes, on the worktop, usually, the worktop is chemical resistant material, such as the phenolic, epoxy resin, ceramic, stainless steel, Trespa, etc.
Sash: A sash is a glass or acrylic work as a shield between the user and the worktop, the sash can be moved vertically or horizontally. It can be a barrier when the potential explosive or the chemical reaction liquid spread out. It looks like a door for the fume hood.
Airfoil: In front of the fume hood, you can see it at the bottom, this will help the air flow into the hood smoothly, so it can avoid turbulence that will lead to the harmful substances escape.
Baffle: This is an adjustable panel located at the rear of the lab hood, it can evenly distribute the air flow go through the opening.
Exhaust Plenum: This part is used to collect the air from the fume hood inside, then pass to the exhaust ductwork to remove away from the bench top.
Exhaust Dust: The ductwork is connected to the hood, so the collected contaminated air will flow through to release to outside the lab.
Lighting: The light will illuminate inside the fume hood, so you can accurately work and see.
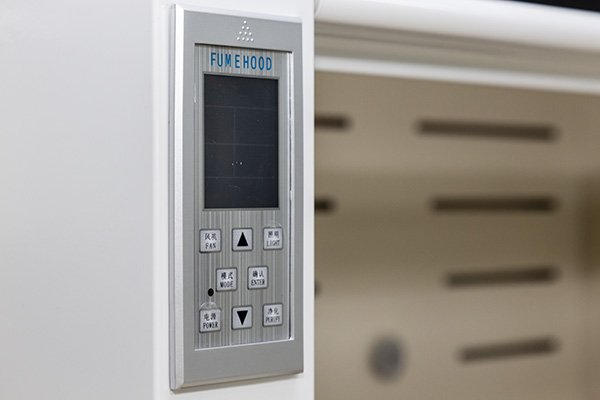
Control Panel: The control panel is in front of the hood, it usually includes the switch for lighting, fan speed control, fan speed controls, and alarms for airflow monitoring systems. It allows the user to monitor and control the fume hood’s operation.
Airflow Monitor: It can measure and display the airflow. The alarm can alert the user when the airflow is falling below the safe level.
Base Cabinets: Often, fume hoods are mounted on base cabinets, which may be used for storage of chemicals and equipment. These cabinets can be vented to provide additional safety by preventing the buildup of hazardous fumes.
Types Of Lab Fume Hood
Ducted Fume Hoods
An external exhaust will connect to the hood, then the experiment waste air or substance will be compelled to remove outside.
Bench Top Fume Hoods: A fume hood place on a lab workbench.
Floor Mounted (Walkin) Fume Hoods: This type of laboratory vent hood is used to carry out the large experiment, usually, it needs to be mounted on the floor.
Ductless Fume Hoods
If the external environment is not allowed to install the exhaust and at the same time, the experiment cannot produce the toxic elements, then the air can be filtered back to the laboratory.
Carbon filtered Hoods: For organic vapors.
HEPAfiltered Hoods: For particulate matter and biological contaminants.
Special Requirements Fume Hoods
This ume hoods has great potential danger, it needs to pay more attention when having an experiment.
Explosionproof Fume Hoods: The flammable material will use in the experiment.
Perchloric Acid Fume Hoods: A washdown system is designed to prevent the danger caused by explosive perchlorates.
Radioisotope Fume Hoods: It is made of stainless steel to handle the radioactive material.
Polypropylene Fume Hoods: When your experiment needs to deal with dense acid or dense alkali. PP fume hood can resist the high corrosive chemical.
Variable Air Volume (VAV) Fume Hoods
The face velocity can be adjusted when the sash position is changed. It is an energy saving fume hood.
Bypass Fume Hoods
It can supply constant airflow regardless of the sash position, so that the high face velocity will not happen to affect the safety operation.
How To Buy A Fume Hood?
There are Several factor you need to consider when buying a hood in your lab.
Types Of Your Lab
Different types of lab will deal with different of chemicals. For example, the chemical lab, will need resistance on corrosion. So, the worktop you can choose phenolic or epoxy resin. If your lab is a bio lab, you can choose stainless steel fume hood.
Your Lab’s Environment
If your lab’s position is not allowed you install the exhaust, you need to consider a ductless fume hood.
The Layout and Space of the Lab
The lab furniture manufacturer can produce according to your size, send the lab layout or your CAD drawing to the supplier, they will give the right size of the hood.
Safety and Compliance
Make sure the hood you buy can meet your local regulations.
Replacement Of Parts
Is it easy to get a part, you need to evaluate it.
Cost and Budget
The initial buying cost and the ongoing cost such as the energy consumption, etc.
How To Install The Fume Hood?
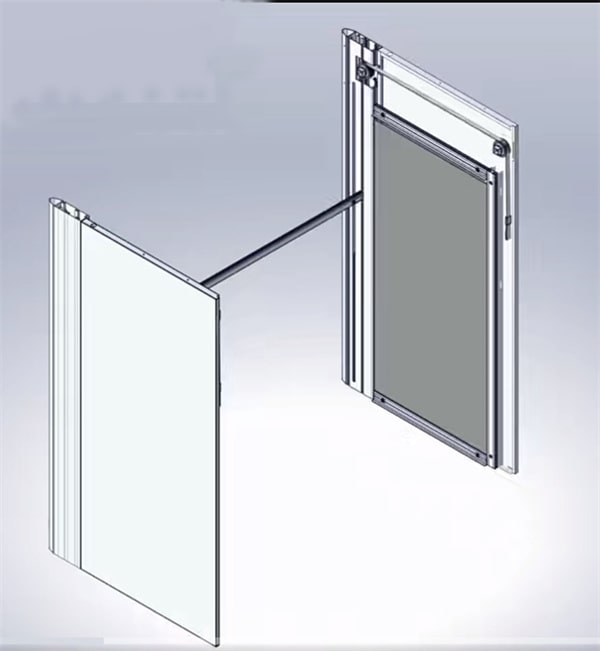
Step 1
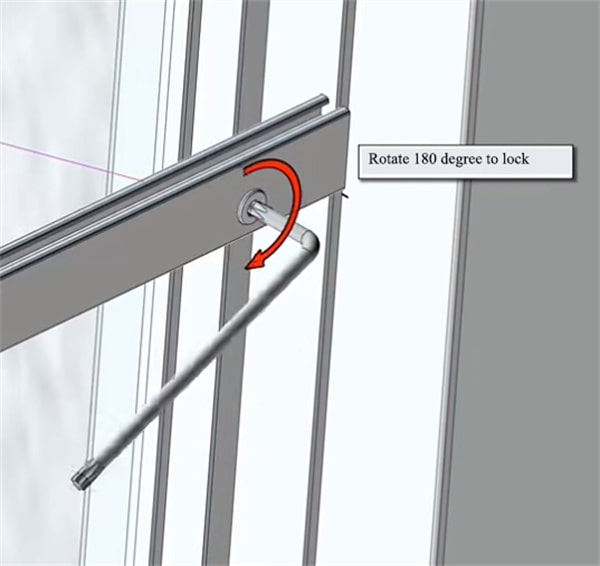
Use the cross bar to connect the two-side panel.
Step 2
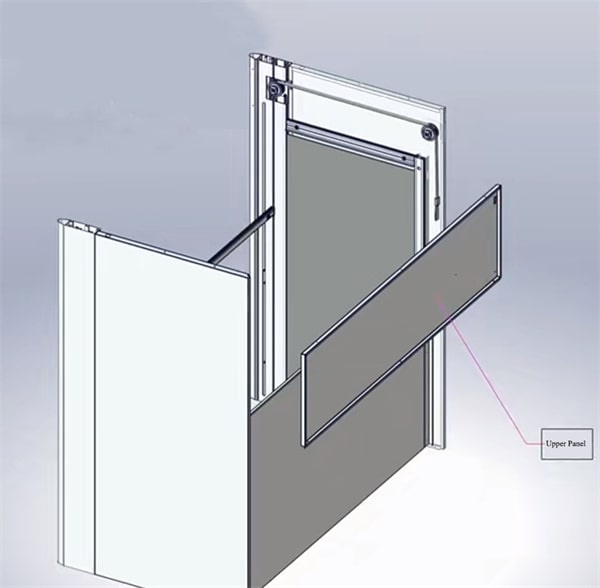
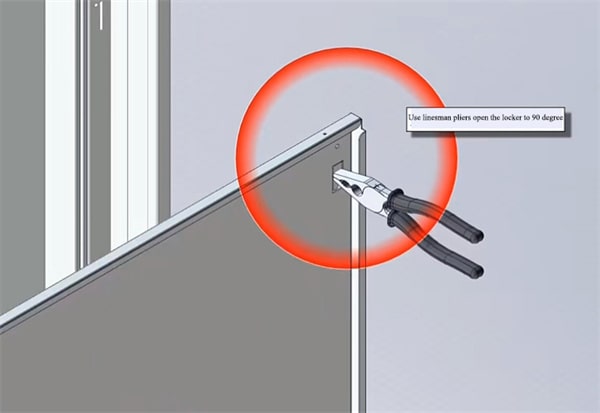
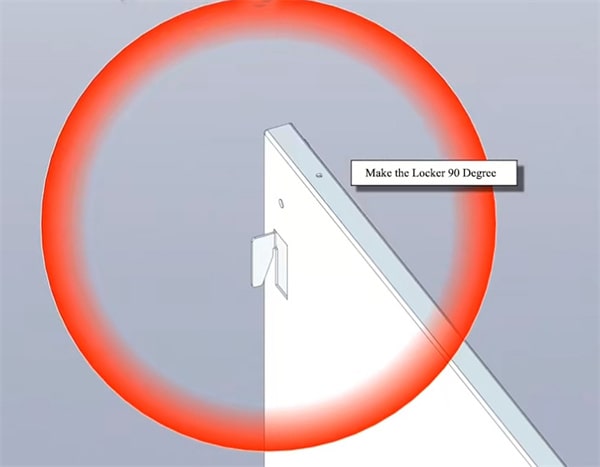
Install the back panel.
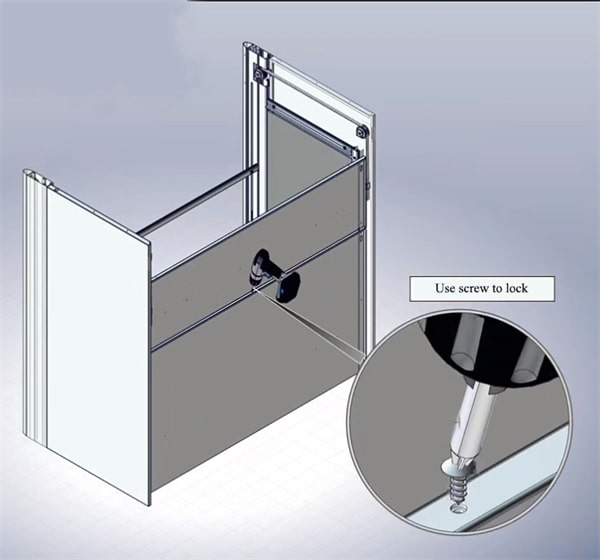
Step 3
Install the view window.
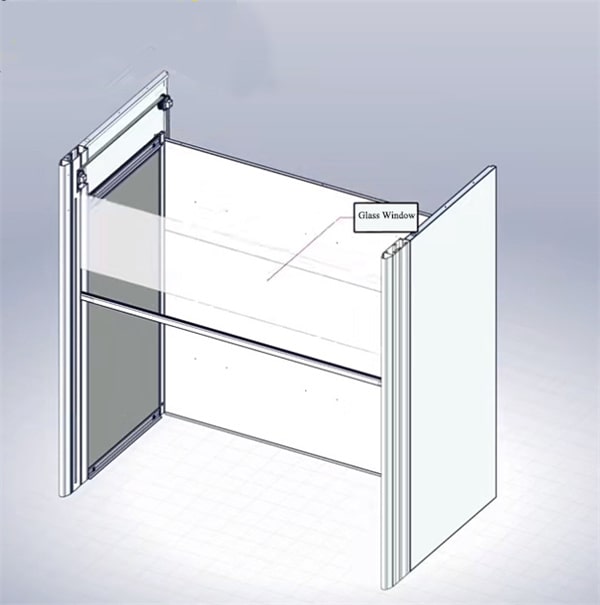
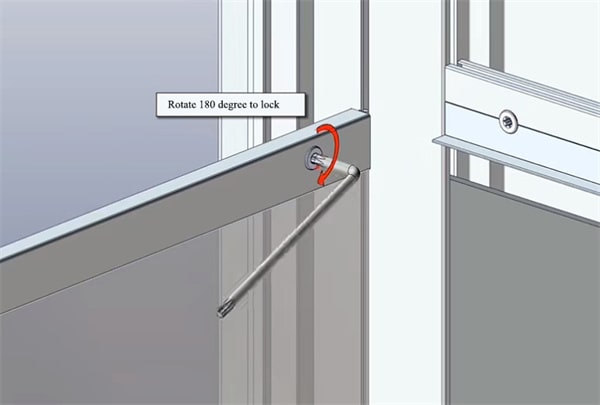
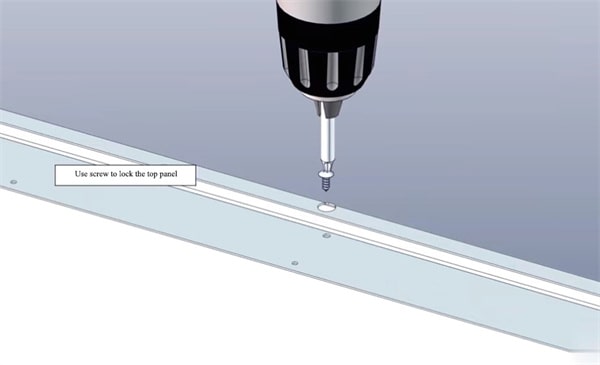
Step 4
Install the top panel.
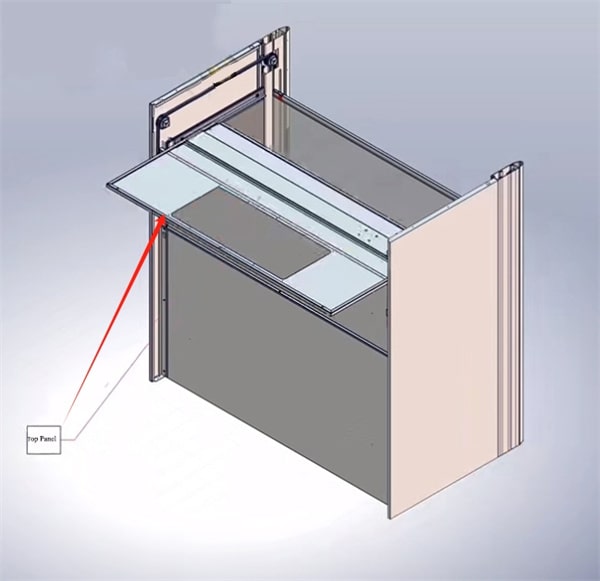
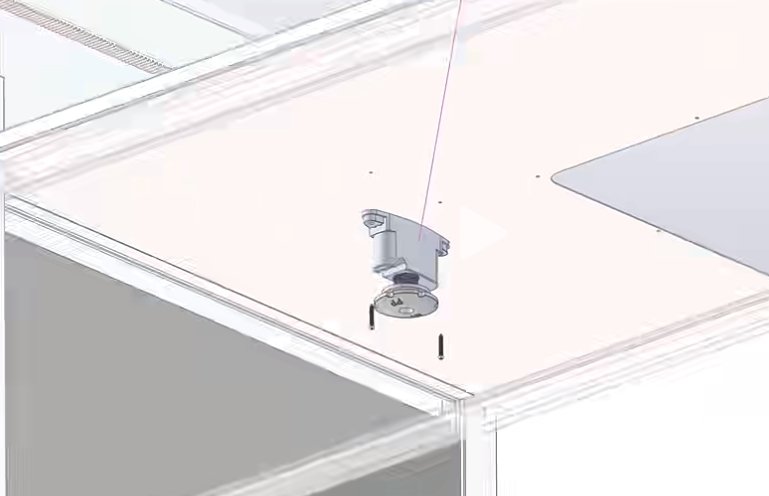
Step 5
Install the air flow guide panel fixture.
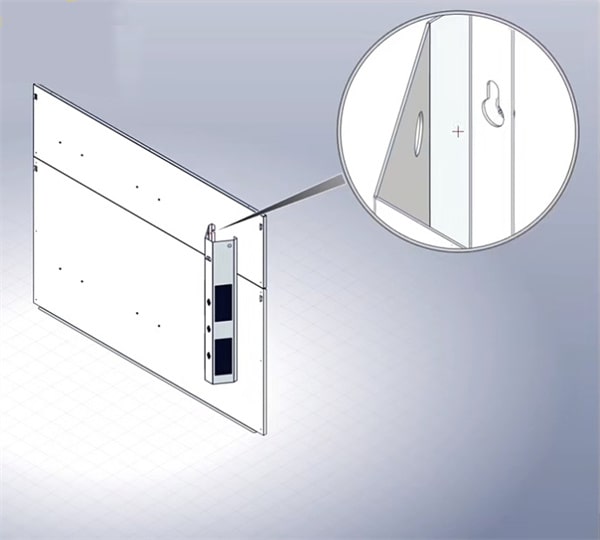
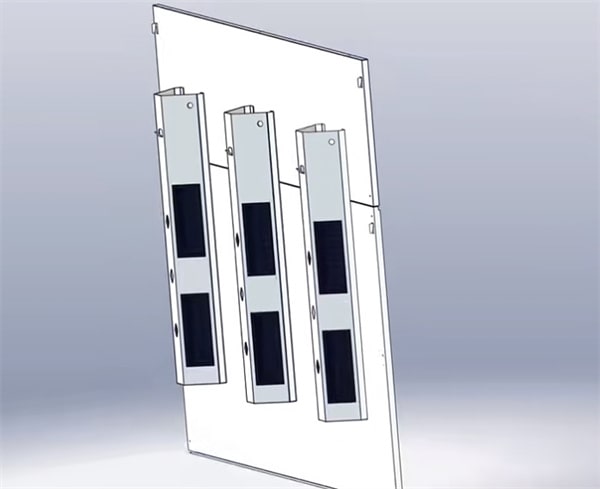
Step 6
Install the air flow guidepost.
Step 7
Install the air exhaust cover.
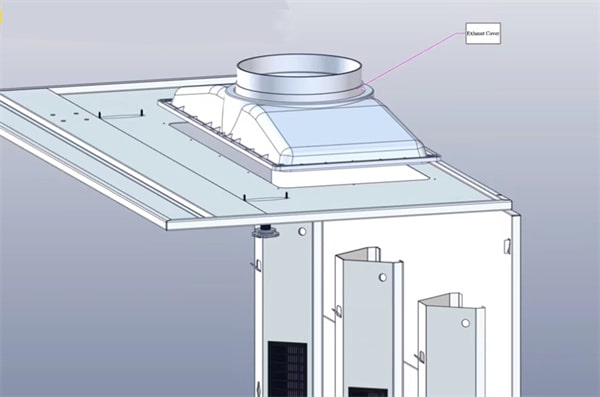
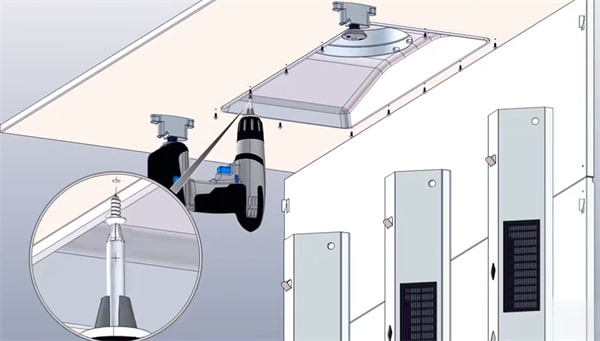
Step 8
Install the air guide panel.
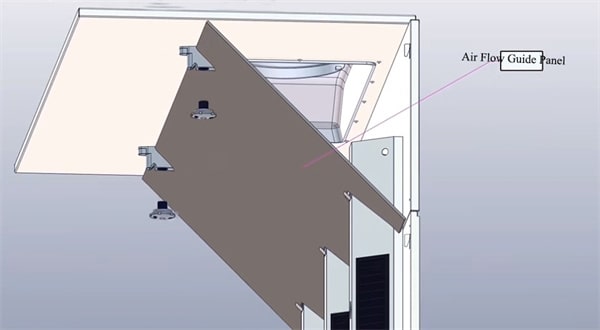
Step 9
Install the sash moving rod.
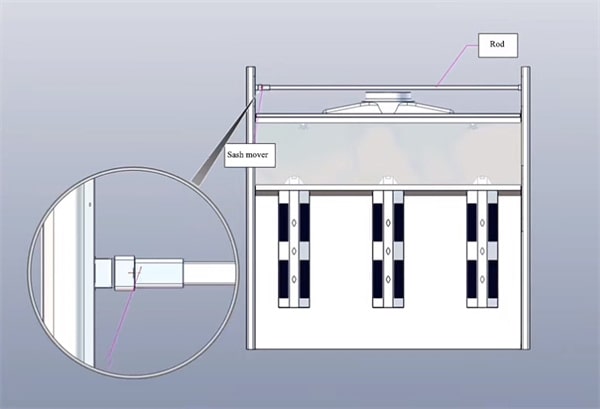
Step 10
Install the sash.
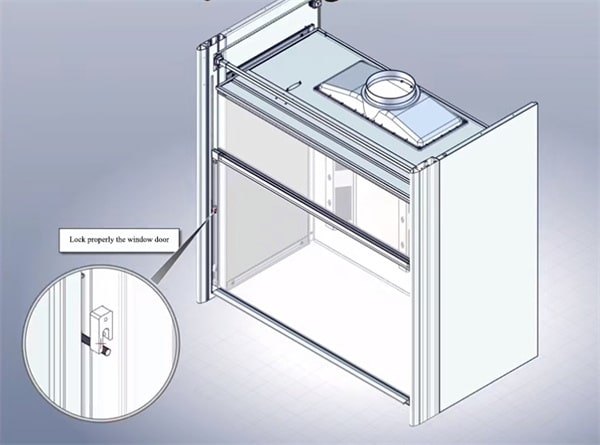
Step 11
Put the counterweight on the hood.
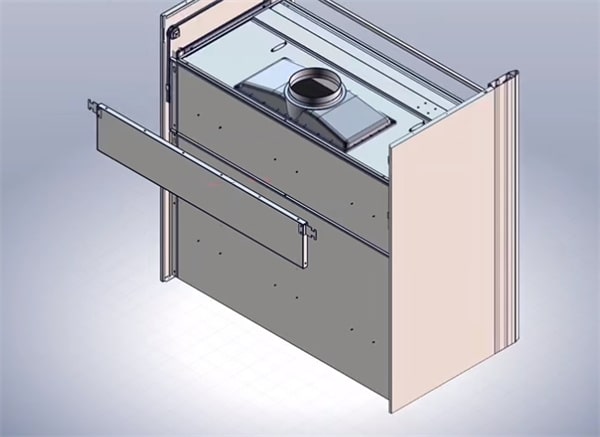
Step 12
Install the panel in front of the upper part of the fume hood.
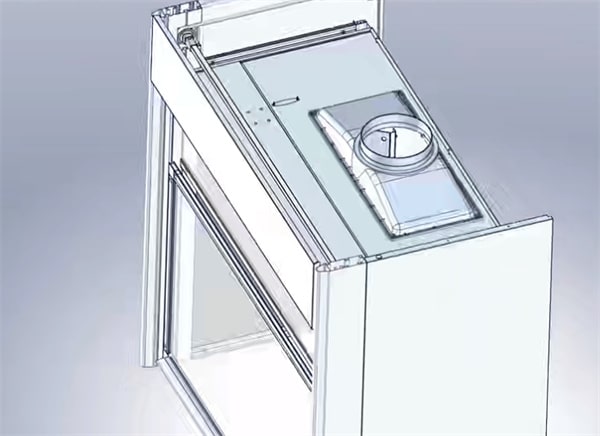
Step 13
Install the control panel.
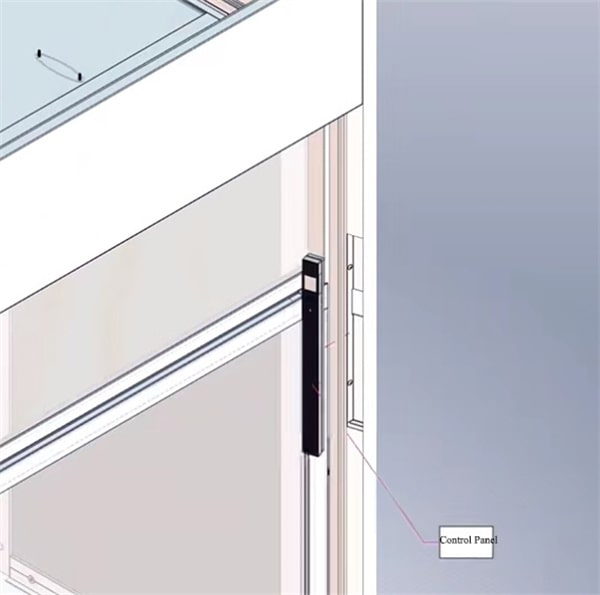
How To Maintain The Fume Hood?
Parts that Need Regular Cleaning
Hood Body
Frequency: Regularly, after each use if possible.
Reason: To remove hazardous gases, vapors, and residues that can accumulate and affect safety and performance.
Baffles
Frequency: Monthly or as needed based on usage.
Reason: To ensure airflow uniformity and prevent the buildup of contaminants that can obstruct airflow.
Sash
Frequency: Regularly, particularly the glass surface.
Reason: To maintain visibility and ensure proper sliding and sealing. Clean sash to avoid contaminants affecting user safety and containment efficiency.
Airfoil
Frequency: Monthly or when spills occur.
Reason: To prevent turbulence and ensure smooth airflow into the hood.
Work Surface
Frequency: After each use.
Reason: To remove chemical residues and prevent contamination of future experiments.
Exhaust Plenum
Frequency: Biannually or more frequently if issues are noticed.
Reason: To remove any debris such as paper towels that might have been drawn in, preventing turbulence and maintaining proper airflow.
Parts that Need Regular Replacement
Prefilter and Filters (if applicable)
Frequency: According to manufacturer’s recommendations or whenever airflow is noticeably reduced.
Reason: To maintain adequate face velocity and filtration efficiency, ensuring the removal of contaminants.
Sash Cables and Pulley Systems
Frequency: Annually or when signs of wear are evident.
Reason: To ensure smooth and reliable operation of the sash. Worn components can compromise the containment capabilities of the hood.
Light Bulbs
Frequency: As needed.
Reason: To ensure adequate visibility inside the hood, enhancing safety and accuracy during experiments.
Fan Belts
Frequency: Annually or as needed based on wear.
Reason: To maintain effective exhaust and airflow through the hood. Worn belts can slip and reduce airflow efficiency.
Ductwork and Connection Seals
Frequency: Every few years or when leaks are detected.
Reason: To prevent leaks and ensure proper exhaust of hazardous materials from the laboratory environment.
By following these cleaning and maintenance practices, the fume hood will continue to provide effective protection for laboratory personnel and ensure a safe working environment.
What Function Need To Test?
When testing a laboratory fume hood, several functions should be evaluated to ensure it is operating safely and effectively. Here are the key functions to test:
Face Velocity Measurement
Purpose: To verify that the airflow velocity at the hood face meets the required specifications (typically 100 feet per minute or 0.5 m/s).
Method: Use an anemometer or similar device to measure the velocity at multiple points across the hood face.
Frequency: At least annually, or more frequently if there are changes in the laboratory environment or hood performance.
Smoke Test
Purpose: To visually confirm that the airflow within the hood is capturing and exhausting contaminants effectively.
Method: Use smoke tubes or other visual indicators to observe the airflow patterns within the hood. Ensure that smoke is drawn smoothly into the hood without escaping into the laboratory.
Frequency: Annually or after any significant changes or repairs to the system.
Sash Operation Test
Purpose: To ensure that the sash operates smoothly and can be positioned correctly to maintain appropriate face velocity and containment.
Method: Manually move the sash up and down, checking for smooth operation, proper alignment, and ease of movement. Ensure the sash can be held at the recommended working height and closed completely.
Frequency: Regularly, ideally monthly or during each inspection.
Exhaust System Functionality
Purpose: To verify that the exhaust system is effectively removing contaminated air from the hood and laboratory.
Method: Inspect and test the exhaust fan, ductwork, and any filtration or scrubber systems. Check for proper airflow and pressure drop across the system.
Frequency: Annually or more frequently if issues are suspected.
Containment Test
Purpose: To ensure the hood can contain and exhaust hazardous materials without leakage.
Method: Use tracer gas tests or other methods to simulate the presence of hazardous materials and verify that they are fully contained within the hood.
Frequency: Periodically, especially after modifications or repairs to the hood or exhaust system.
Alarm and Monitor Functionality
Purpose: To verify that all alarms and monitors (such as airflow monitors or sash position sensors) are working correctly.
Method: Test each alarm and monitor by simulating conditions that should trigger an alert. Ensure that the alarms are audible and/or visible as required.
Frequency: Annually or whenever maintenance is performed.
Structural Integrity Check
Purpose: To ensure that the physical components of the hood, such as the sash, airfoils, baffles, and work surface, are in good condition and functioning as designed.
Method: Visually inspect all components for damage, wear, or corrosion. Check for proper installation and alignment.
Frequency: Regularly, during each inspection.
By systematically testing these functions, you can ensure that the fume hood operates safely and effectively, providing the necessary protection for laboratory personnel and the environment.
The Safety Operation Of Fume Hood
The fume hood is very often used in the chemistry lab. Therefor, it is very easy to produce hazardous substance. The safety operation is essential to ensure the lab personnel’s health and safety.
Pre-use Inspection and Setup
Face Velocity Check: Ensure the face velocity is within the recommended range (100 feet per minute or 0.5 m/s). Use an anemometer to measure the airflow.
Visual Inspection: Check for any visible damage or obstructions in the hood, such as debris in the exhaust plenum or obstructed baffles.
Sash Position: Verify that the sash is at the correct height for optimal airflow, typically marked on the hood. The sash should be closed when the hood is not in use.
During Use
Proper Sash Operation: Keep the sash at the recommended height while working. Do not raise the sash above this height except for setting up equipment. Close the sash completely when not working in the hood.
Positioning: Conduct all work at least 6 inches back from the face of the hood. This minimizes the risk of contaminants escaping into the lab.
Minimize Movements: Avoid quick motions into or out of the hood and minimize traffic around the hood to prevent airflow disturbances.
Containment Practices: Use condensers, traps, or scrubbers to contain and collect waste solvents, toxic vapors, or dust. Do not use the hood as a waste disposal mechanism.
Personal Protective Equipment (PPE)
Eye Protection: Always wear splash goggles. Use a full face shield if there is a risk of explosion or chemical splashes.
Gloves and Lab Coats: Wear appropriate gloves and a lab coat to protect against chemical splashes and spills.
Good Housekeeping
Limit Storage: Only keep the necessary amount of chemicals and equipment in the hood needed for the procedure. Excess storage can cause turbulence and reduce containment efficiency.
Cleanliness: Regularly clean the hood body, work surface, and baffles to remove chemical residues and prevent contamination.
Chemical Management: Keep caps on chemical reagent bottles tight and check fittings on laboratory glassware to minimize vapor loss.
Emergency Procedures
Power Outages: In the event of a power outage, lower the sash to within an inch to maintain a chimney effect and keep some air flowing into the hood.
Exhaust System Failure: If the exhaust system fails, shut off all services and accessories, lower the sash completely, and leave the area immediately.
Spill Response: Be prepared to handle chemical spills within the hood. Know the location of spill kits and follow proper spill cleanup procedures.
Regular Testing and Maintenance
Annual Testing: Ensure that the fume hood undergoes regular testing, including face velocity measurements and air flow monitor, smoke tests, and containment tests.
Filter Replacement: Replace filters and other consumables according to the manufacturer’s recommendations or when airflow is noticeably reduced.
Inspection: Regularly inspect sash cables, pulley systems, and other mechanical components for wear and replace as needed.
Training and Standard Operating Procedures (SOPs)
User Training: Ensure all laboratory personnel are trained on the proper use and limitations of the fume hood.
SOP Adherence: Follow the Standard Operating Procedures for the specific fume hood in use. Design experiments to maintain SOP whenever hazardous materials might be released.
By adhering to these safety operation guidelines, you can maximize the effectiveness of laboratory fume hoods in protecting against exposure to hazardous substances and maintaining a safe working environment.
The above knowledge will be helpful for you if you are starting to work in the laboratory.
